Skip to content
In this modern packaging industry, Mylar packaging bags end up being effective and ideal for preserving food and non-food products. Thus, we can see many individuals and businesses have been trusting these bags for long-term storage of their products. Yet, when it comes to preserving any type of product, you need to seal these Mylar bags carefully and properly. Well then, to help you out in this context, check out a complete guide you need to seal mylar bags!
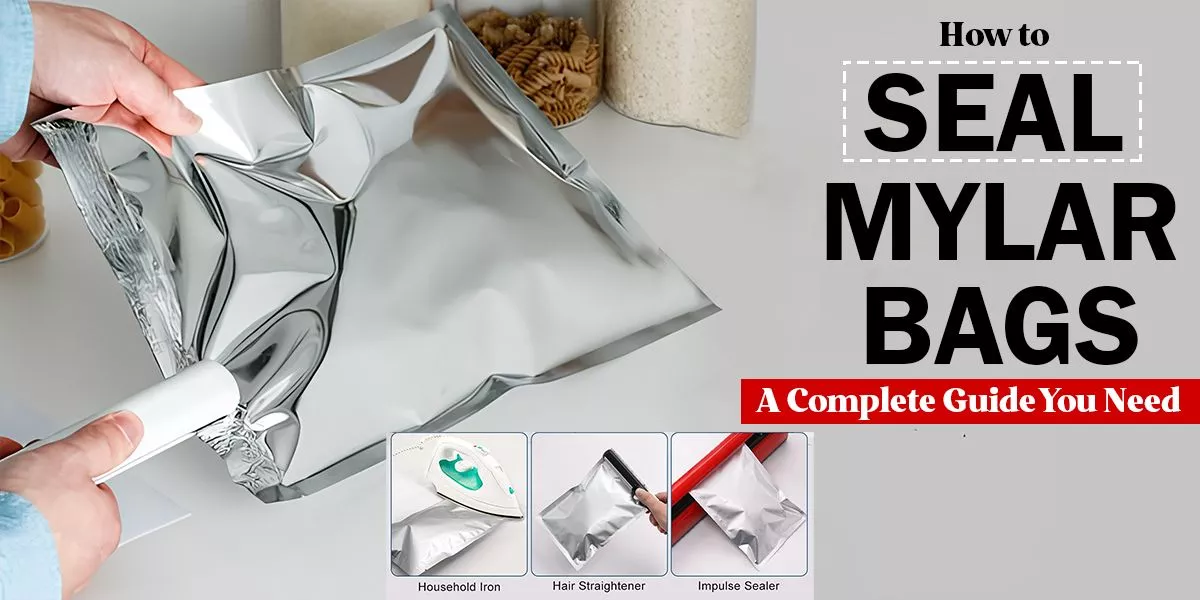
Learn How Do You Seal a Mylar Bag Properly
Without any doubt, we must say that sealing each bag properly is highly essential if you are planning to use Mylar bags.
Moreover, if you are able to seal the Mylar bag properly, you can preserve your products inside with a high level of protection.
So, without any further ado, here are the steps you need to seal mylar bag!
Prepare the Materials
- Make sure you get excellent quality Mylar bags for your products
To get proper sealing, you will need mylar bags of excellent quality. Most importantly, the bags should be at the exact size to fit your products comfortably.
- Get the Right Heat Sealer
So, what is the best tool to seal mylar bags?
Well, an impulse sealer will be ideal here. Thanks to its capability of generating heat to melt all the edges of the bag together, you can create an airtight seal for your Mylar bags.
- The right amount of oxygen absorbers
To remove oxygen from the bag, you will need the right amount of oxygen absorbers.
Follow the Steps
First of all, in order to seal a mylar bag properly, you must know how its structures work. In general, mylar bags come with different plastic layers inside and out. Plus, you will see a middle layer of aluminum on the bags which helps a lot when it comes to knowing how to seal mylar bags for food storage.
Well then, let’s start the sealing process!
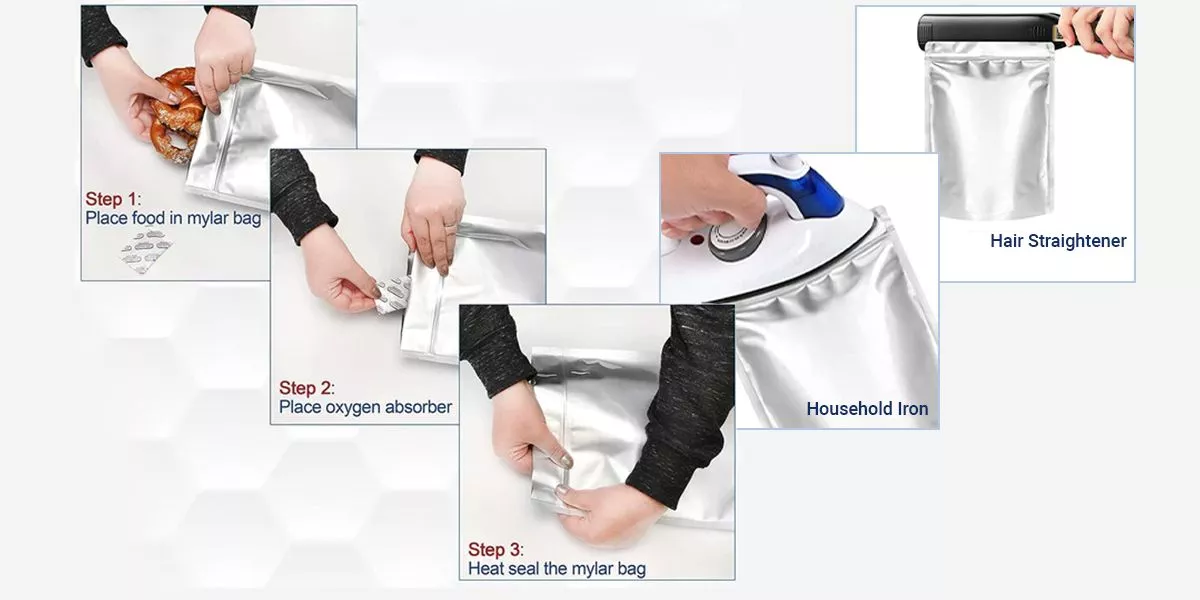
Step 1: Prepare Your Products
You must always make sure that your products are clean, dry, and, of course, moisture-free before placing them into the Mylar bag. To store food products, you will need oxygen absorbers. Yes, with oxygen absorbers, you can prevent spoilage. Even better, the bag will maintain the freshness of your food inside.
Step 2: Open Your Mylar Bag
To seal the bag, you must open the top of the Mylar bag and place your products inside. At this step, make sure you will fill the bag to get the right space for sealing.
Step 3: Fold the Top of the Mylar Bag
The next thing to do is to fold the top portion of the bag. This will give you a clean and flat surface. Better yet, this clean surface will help you get a better sealing. Moreover, with a clean surface, you can prevent any potential contamination.
Step 4: Set Up the Heat Sealer
Now, you can turn on your impulse heat sealer and you must set it up to the ideal temperature for a Mylar bag material. For this reason, you should make time to check the manufacturer’s instructions. They will surely have guidance regarding the most ideal temperature setting you should get. Then, press down on the heat sealer’s arm to apply heat and pressure to your mylar bag. Remember that you should hold the sealer for a few seconds to melt the Mylar material.
Step 5: Check on the Seal
In order to avoid any errors, you must check on the sealed area of your Mylar bag. After all, you surely want to ensure that the sealing is properly done. And guess what? It will be very easy as you can simply gently tug on the sealed area. However, when doing this, you should make sure that the seal on your Mylar bag is airtight. Plus, in case you see the seal is unproperly done, you should consider resealing the bag for a better result.
But wait, how to remove air from mylar bags before the sealing process?
Well, don’t worry as you can gently press your Mylar bag. You should start from the top, and then continue on to the bottom. Finally, when you see that the air has been removed from the bag, you can then seal the bags.
In brief, of course, sealing a mylar bag can be challenging. In this context, if you have no idea or are new to sealing Mylar bags, you can try practicing the sealing process with some empty bags. Most importantly, you must always follow the instructions provided by the manufacturer of your heat sealer to get the best results.
What Thickness of Seal You Need for Mylar Bags?
Knowing how to seal die-cut mylar bags will not be complete if you don’t know the type of thickness you need to seal Mylar bags.
So, an impulse sealer will typically offer 2mm, 5mm, or 10mm seals. Of course, the thicker will usually be better. However, you will also want to adjust the thickness according to the type of product and bag itself.
For example, a 2mm seal is usually only suitable for thin polybags. Do note that most mylar packaging bags should have at least a 5mm seal applied to them. Most importantly, an 8mm or greater seal is often required to prevent bag bursting.
Can We Print on Mylar Bags?
Generally speaking, printing on Mylar bags can be a bit challenging. After all, we know that the bags have slick and non-porous surfaces. However, when you partner up with reliable packaging suppliers like Instant Custom Boxes, you will get a proper guide.
So, here is some general guidance on printing on mylar bags
Label Printing Technique
Check out the process of label printing technique!
- Print your design
The first thing to do is print your design onto label sheets. You can use a standard printer for this. However, one thing you should note here is that label sheets come in various sizes. In this regard, make sure you choose a size label sheet that fits properly well on your cut-out Mylar bags.
- The cutting process
Now, you should carefully cut out the printed labels from the label sheets. Then, you can peel off the backing of the labels to easily stick them onto your Mylar bags and press them strongly. This will give proper adhesion to your Mylar bags.
Direct Printing
Here are the processes to know in the direct printing technique!
A compatible printer
First off, you should choose a compatible printer with the Mylar material. If you have no idea, you can simply go with Inkjet printers. However, if you wish to get proper adhesion, you need a specific printer that provides specialty inks and settings.
Then, you should adjust your printer settings, such as:
- Paper type you use
- Print quality you need
- Color calibration
Apply high-resolution artwork design
To print your Mylar bag exclusively, make sure that your artwork design is of high resolution. In addition, your design should be appropriate for the size of the bag.
Practice test printing
Before you start printing on the actual Mylar bags, you can actually practice with a test print on regular paper.
Well, by doing test printing, it will be easier for you to make sure that the design and colors are all correct.
Properly align the mylar bag to the printer
When it comes to loading the Mylar bag into the printer, make sure that the bag is properly aligned. Why?
When you align the bag properly, you can prevent any printing errors from occurring all through the printing process.
Even better, you can make sure that the ink is printed correctly to the Mylar surface. In simple words, you should pay attention to the overall printing progress.
Nevertheless, whatever printing method you want to choose, you should also keep in mind that Mylar bags are very delicate here. For this reason, you must handle them carefully to maintain the quality of your printed design.
Summing Up
Indeed, sealing Mylar bags properly is highly essential when it comes to preserving your products for the long term. Luckily, there are easy steps to follow in sealing Mylar bags properly and carefully. Well then, hopefully, the guide we revealed here will help you in sealing your Mylar bags properly.